Multi-Column TreeView Control

This article provides a control which extends the vbAccelerator TreeView control to provide multiple columns, complete with headers for each of the columns.
A Multi-Column Tree
The technique used here to create a multi-column tree is based on an MFC article by Michal Mecinski at CodeGuru. The TreeView control is created with the TVS_NOHSCROLL so that it never displays a horizontal scroll bar. Then it is added, along with a header control implementation into a container control, and the container control is configured so that if the total column width is greater than the width of the control then a horizontal scroll bar is shown. Finally, when the Tree View control is rendered, the Custom Draw facilities are used to overdraw the text drawn by the control with the columns and grid lines if necessary.
Internally, these are implemented in the control using code from existing components on the site:
- The TreeView with custom-draw support is taken from the vbAccelerator TreeView Control.
- The Header is derived from the Header Control.
- The Horizonal Scroll bars is added to the control using ScrollBars class.
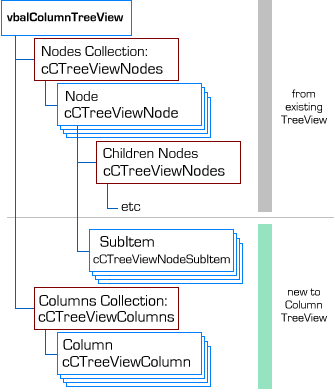
In the original sample,the text for each column is stored as a tab-delimited string in the node. Although simple, it means that some built-in facilities of the TreeView such label editing will not work correctly. In this sample, the text for the other columns is stored in a class which is associated with the node; this also provides a route for further options to be added in the future such as text alignment and different colours for the items.
The diagram belows shows the object model for the new control:

Multi-Column Tree Control Object Model.
Using the Control
Using the control is much the same as using the vbAccelerator TreeView which is described in other articles in this section. The main differences are:
- The common objects such as Nodes have a different class name: they are prefixed with cCTreeView rather than cTreeView (this is so you can use the column tree view easily in a project which also contains a normal TreeView).
- The History and ShowNumber styles are not supported; neither is it possible to turn Custom Draw off.
- You can add and remove columns using the Columns collection.
- The text to appear in the new columns can be specified through the SubItems property of a node.
I'll cover the last two points in turn.
Configuring Columns
To add a column to the control, use the Columns collection. When a column is added, you can configure the text that will appear in the header and its width at the same time (there is also the possibility of a column image, although that is not yet implemented in this release). Note that the first column in the control cannot be removed, although you can change it's properties.
Private Sub setUpColumns()
Dim cCol As cCTreeViewColumn
   With tvwColumns
      With .Columns
         Set cCol = .Item(1)
         cCol.Width = 128
         cCol.Caption = "Name"
         Set cCol = .Add("TRACK", "Track")
         Set cCol = .Add("LENGTH", "Length")
         Set cCol = .Add("SIZE", "Size")
      End With
   End With
End Sub
Configuring Text for Additional Columns
Once you have some columns, you can start adding text to display in the sub-items. The default for the sub-items is for the column to appear blank. To change the text, use the SubItems property of a Node. This works in a similar way to the SubItems of a MSCOMCTL.OCX ListView item, in that the first sub-item specifies the data for the second column, the second sub-item specifies the data for the third column and so on:
Private Sub addTrack( _
       parent As cCTreeViewNode, _
       ByVal sKey As String, _
       ByVal sTrack As String, _
       ByVal lTrackNumber As Long, _
       ByVal dLength As Date, _
       ByVal lSize As Long _
   )
Dim nod As cCTreeViewNode
   ' Node text appears in column 1:
   Set nod = parent.AddChildNode(sKey, sTrack)
   ' SubItem(1) is the Track column:
   nod.SubItem(1).Text = lTrackNumber
   ' SubItem(2) is the Length column:
   nod.SubItem(2).Text = Format(dLength, "nn:ss")
   ' SubItem(3)  is the Size column:
   nod.SubItem(3).Text = Format(lSize / 1024, "#,##0 KB")
End Sub
Conclusion
This article provides a multi-column TreeView control. Although the formatting support for the columns is fairly rudimentary, it should be easy to extend in the future. Suggest options you would like to see implemented and I'll take a look into it.